Zoom H5/UG/08 Recording
Properties
- logseq-entity
- Logseq/Entity/Book/Section/Level 1
Recording
Recording mode overview
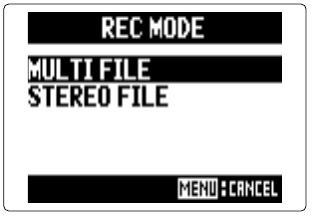
- The H5 has two recording modes, MULTI FILE and STEREO FILE. They create different file types and allow different recording formats.
MULTI FILE mode
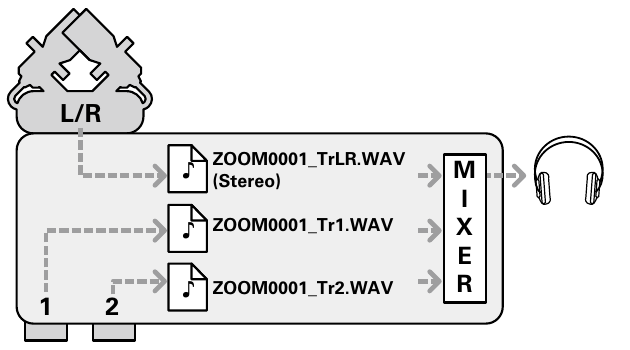
- The L/R inputs from the XY mic or another input capsule record to the L/R tracks. Inputs 1 and 2 record to tracks 1 and 2. Each track is saved as a separate file.
- Because every input has its own file, the playback volume and panning of each one can be changed independently after recording.
- Only 44.1 kHz or 48 kHz WAV, at 16 or 24 bits, can be recorded in this mode.
- Linking Inputs 1 and 2 records them together as one stereo file. A recording with the link on creates two stereo files: one from the L/R inputs and one from Inputs 1/2.
- MULTI FILE mode: one file per track, mixed for monitoring
STEREO FILE mode
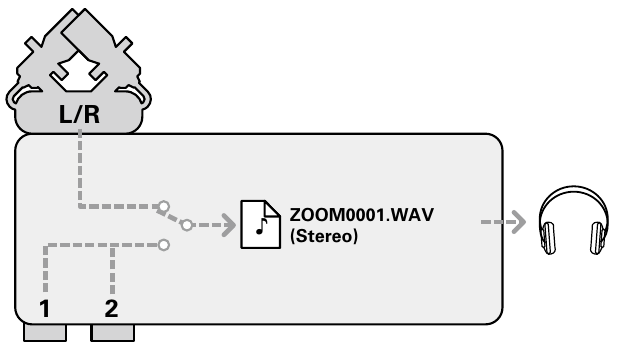
- Whichever of the L/R inputs and Inputs 1/2 are selected record together into a single stereo file. Each pair is switched on or off as a pair: Zoom H5/UG/08 Recording/05 Inputs and Levels.
- Only two tracks can be recorded, but any recording format can be chosen: Zoom H5/UG/12 Tools/08 Rec Format. This includes 96 kHz WAV at 16 or 24 bits, and MP3.
- Use this mode for the highest audio quality or for smaller files.
- STEREO FILE mode: one stereo file
Folder and file structure on the H5
- Recording creates folders and files on the SD card in a fixed layout.
- Folders and files on the SD card
Folders
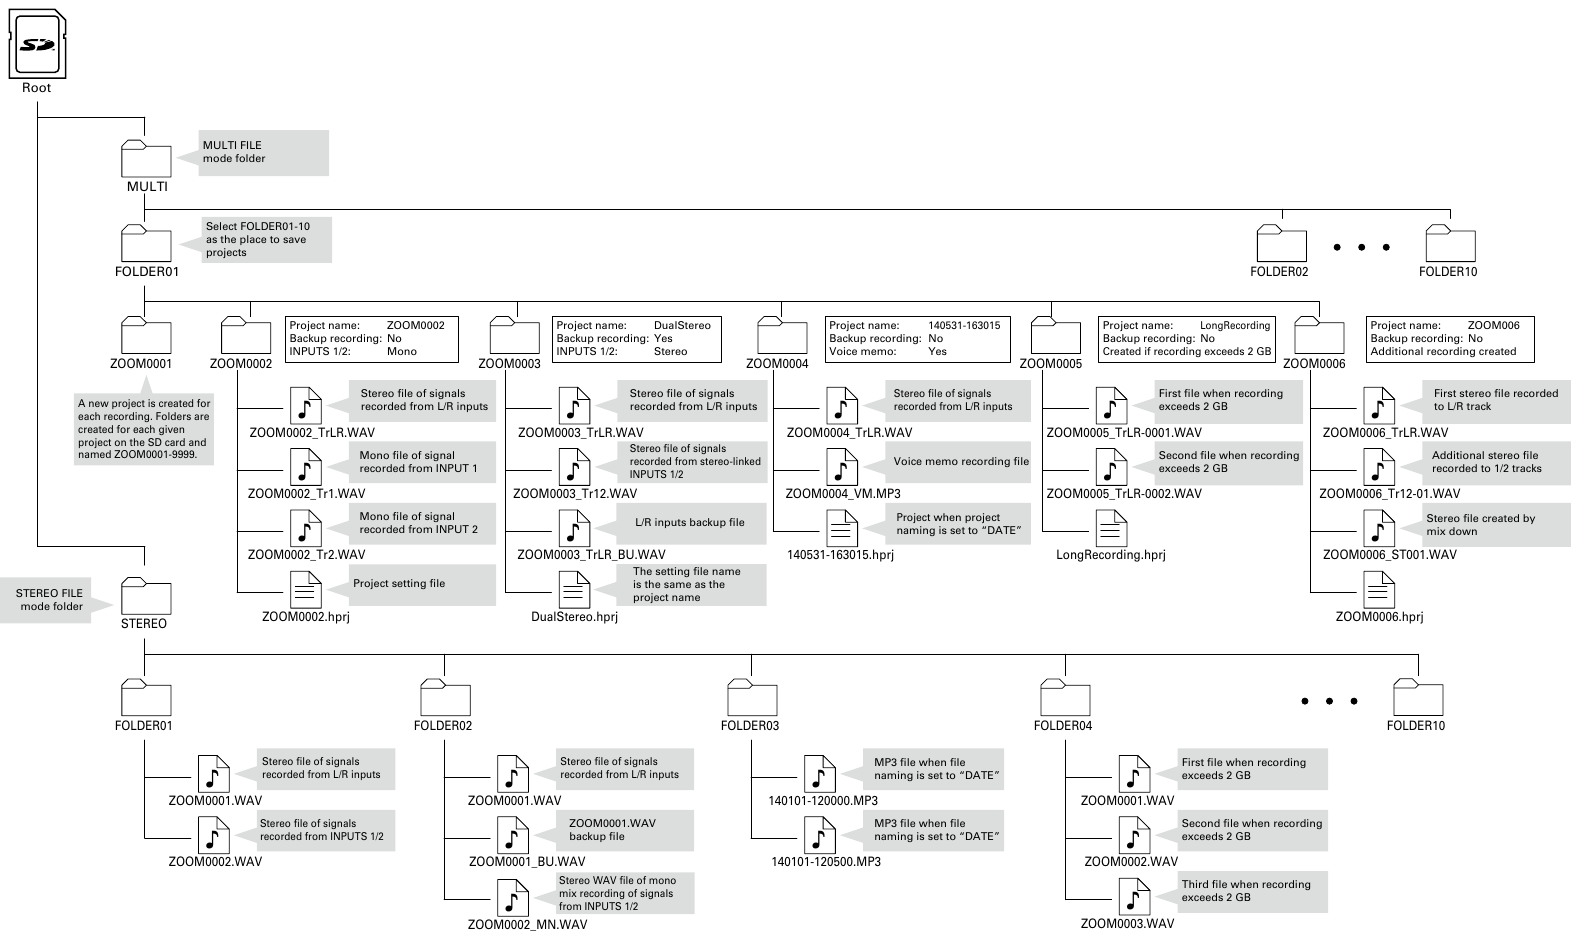
- The card root holds a
MULTIfolder for MULTI FILE mode and aSTEREOfolder for STEREO FILE mode. - Each of these holds ten folders,
FOLDER01toFOLDER10. New recordings go to the selected one: Zoom H5/UG/08 Recording/07 Save Location.
- The card root holds a
MULTI FILE projects
- Each recording creates a new project folder, named
ZOOM0001toZOOM9999. - A project folder holds one audio file per recorded track and a project setting file (
.hprj). The setting file takes the project's name. - Examples:
- Folder
ZOOM0002, Inputs 1/2 recorded as mono, no backup recording - Folder
ZOOM0003, project nameDualStereo, Inputs 1/2 stereo-linked, with backup recordingZOOM0003_TrLR.WAV— stereo file from the L/R inputsZOOM0003_Tr12.WAV— stereo file from the linked Inputs 1/2ZOOM0003_TrLR_BU.WAV— backup of the L/R inputs: Zoom H5/UG/08 Recording/12 Backup RecDualStereo.hprj— setting file named after the project
- Folder
ZOOM0004, project name140531-163015, with a voice memoZOOM0004_TrLR.WAV— stereo file from the L/R inputsZOOM0004_VM.MP3— voice memo: Zoom H5/UG/10 Project and File Editing/12 Voice Memos140531-163015.hprj— the project name when project naming is set toDATE: Zoom H5/UG/12 Tools/10 Naming
- Folder
ZOOM0005, project nameLongRecording, a recording larger than 2 GB - Folder
ZOOM0006, with an added recording and a mixdownZOOM0006_TrLR.WAV— first stereo file, recorded to the L/R trackZOOM0006_Tr12-01.WAV— stereo file added later on tracks 1/2: Zoom H5/UG/08 Recording/13 OverdubbingZOOM0006_ST001.WAV— stereo file made by mixdown: Zoom H5/UG/10 Project and File Editing/04 MixdownZOOM0006.hprj
- Folder
- Each recording creates a new project folder, named
STEREO FILE files
- Each recording is saved as a file directly in the selected folder.
- Examples:
FOLDER01FOLDER02ZOOM0001.WAV— stereo file from the L/R inputsZOOM0001_BU.WAV— backup ofZOOM0001.WAVZOOM0002_MN.WAV— stereo WAV of a mono mix of Inputs 1/2: Zoom H5/UG/12 Tools/07 Mono Mix
FOLDER03FOLDER04
Selecting inputs and adjusting levels
- Choose whether to record the L/R inputs, Inputs 1/2, or both.
- In MULTI FILE mode, the L/R inputs record to the L/R tracks and Inputs 1/2 record to tracks 1 and 2.
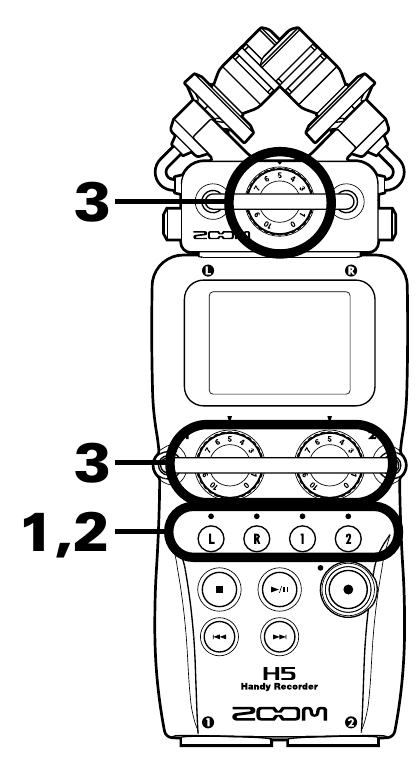
- Track buttons (steps 1 and 2) and input volume knobs (step 3)
- 1. Press the track buttons for the tracks you want to record.
- The indicators of the selected buttons light red. Their input signals can then be monitored through the headphones and line outputs.
Note/Info In STEREO FILE mode, L or R selects the L/R inputs, and 1 or 2 selects Inputs 1/2.
Note/Info In STEREO FILE mode, inputs are selected in pairs. One input of a pair cannot be selected on its own.
- In STEREO FILE mode, skip to step 3.
- 2. In MULTI FILE mode, to record Inputs 1/2 as one stereo file, press 2 while holding 1.
- 3. Turn the input volume knob of each selected input to set its level.
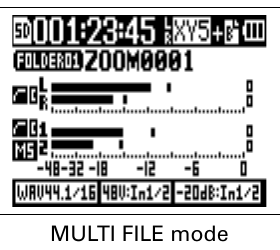
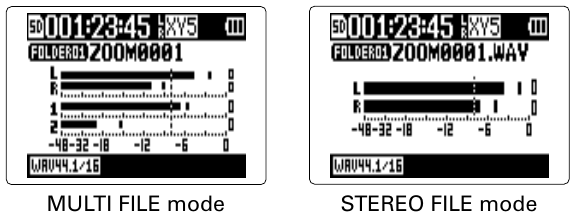
- Level meters in MULTI FILE mode
- Aim for peaks around −12 dB.
- If the sound distorts even with the input level turned down, move the mics or lower the output level of connected devices.
- The compressor/limiter can also control the level: Zoom H5/UG/13 Settings/02 Comp Limiter.
- Wind and other noise can be cut while recording: Zoom H5/UG/13 Settings/01 Low Cut.
Files created
Recording
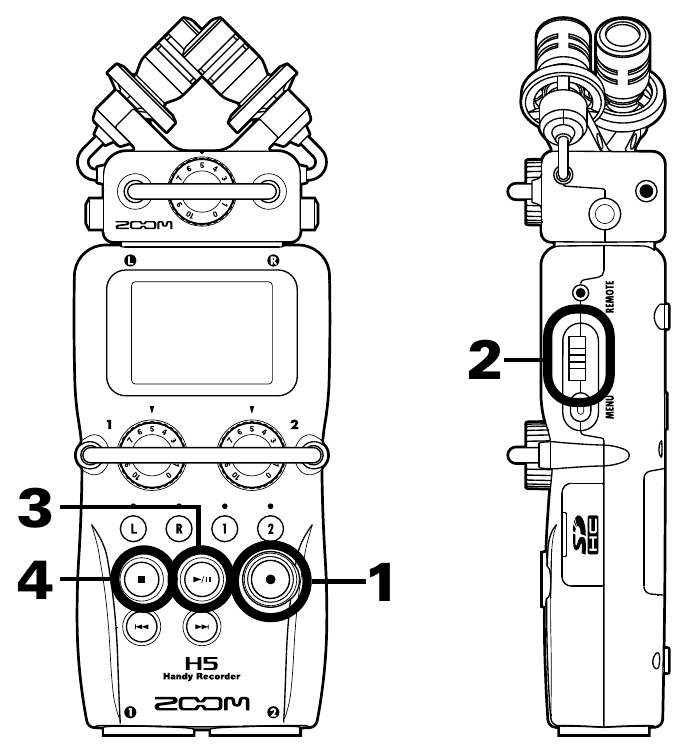
- Recording controls: REC (1), scroll button (2), PLAY/PAUSE (3), STOP (4)
- 1. Press REC to start recording.
- 2. Press the scroll button to add a mark, a reference point for playback.
- 3. Press PLAY/PAUSE to pause.
- 4. Press STOP to stop.
Note/Info In MULTI FILE mode, when a file grows past 2 GB the H5 starts a new file in the same project and keeps recording without a break. The file names end in
-0001,-0002and so on.Note/Info In STEREO FILE mode, when a file grows past 2 GB the H5 starts a new file in the same folder and keeps recording without a break.
Setting where projects/files are saved
- New recordings go to one of ten folders: projects in MULTI FILE mode, files in STEREO FILE mode.
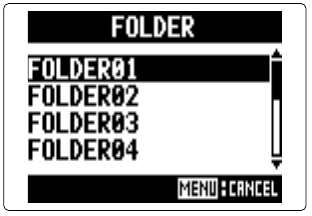
- 1. Press MENU, then use the scroll button to select
FOLDER. - 2. Select the folder for new recordings, then press the scroll button.
- Folder layout on the SD card: Zoom H5/UG/08 Recording/04 Folders and Files
Recording automatically
- Recording can start and stop on its own in response to the input level.
- 1. Press MENU, then use the scroll button to select
REC > AUTO REC > ON/OFF. - 2. Select
ON, then press the scroll button.Note/Info The other automatic recording settings,
REC START LEVEL,REC STOP LEVELandAUTO STOP, are covered in Zoom H5/UG/12 Tools/09 Auto Rec Settings.
- 3. Return to the Home Screen.
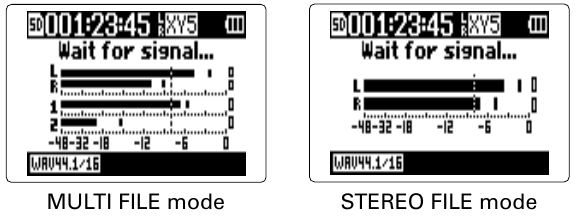
- 4. Press REC. Recording standby starts and the screen shows
Wait for signal....- Recording standby
- When the input rises above the start level shown on the meters, recording starts.
- Recording can also stop on its own when the input falls below a set level: Zoom H5/UG/12 Tools/09 Auto Rec Settings/02 Auto Stop.
- 5. Press STOP to leave standby or to stop recording.
Note/Info
AUTO RECcannot be used together withPRE REC,METRONOMEorPRE COUNT. TurningAUTO RECon disables them. See Zoom H5/UG/08 Recording/09 Pre-Rec, Zoom H5/UG/12 Tools/02 Metronome and Zoom H5/UG/08 Recording/10 Count In.
Counting in before recording
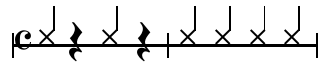
- A count-in can play before recording starts.
- 1. Press MENU, then use the scroll button to select
TOOL > METRONOME > PRE COUNT. - 2. Select the precount number, then press the scroll button.
Note/Info
PRE COUNTcannot be used together withAUTO REC. TurningAUTO RECon disablesPRE COUNT: Zoom H5/UG/08 Recording/08 Auto Rec.Note/Info
PRE COUNTcannot be used together withPRE REC. TurningPRE COUNTon disablesPRE REC: Zoom H5/UG/08 Recording/09 Pre-Rec.
Adjusting the side mic level
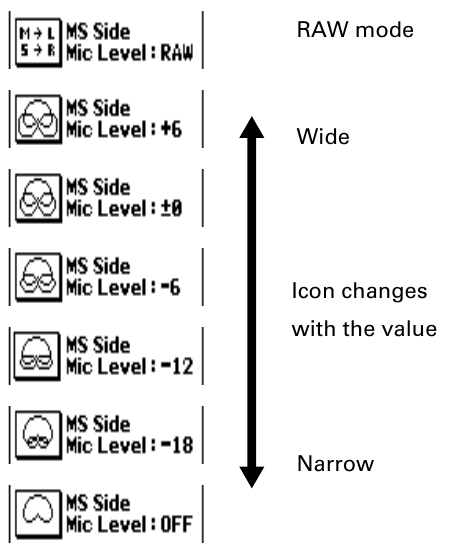
- This works only with an input capsule whose side mic level (stereo width) can be adjusted, such as an MS capsule. Set the level before recording.
- 1. Move the scroll button up or down to adjust the side mic level.
Note/Info For a recording made in MS-RAW mode, move the scroll button up or down during playback to adjust the side mic level.
Note/Info An MS-RAW file is not an ordinary stereo file. To use it with other equipment, convert it to normal stereo with ZOOM MS Decoder or similar software.
Note/Info MS-RAW mode is available only when recording in WAV format.
Overdubbing
- Overdubbing works only in MULTI FILE mode, with 44.1 kHz or 48 kHz WAV formats.
- New recordings can be added to a project that has already been recorded.
Recording an overdub
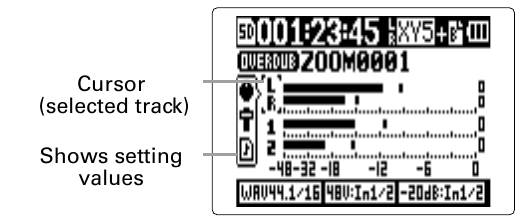
- 1. Press MENU, then use the scroll button to select
PROJECT. - 2. Select the project to overdub, then press the scroll button.
- 3. Select
MIXER/OVERDUB > MIXER/OVERDUB. - 4. Press the track button of the track to overdub. Its indicator lights red, and that track's input can be monitored.
- The Input 1/2 stereo link can also be changed here: Zoom H5/UG/08 Recording/05 Inputs and Levels.
- 5. Turn the input volume knob to adjust the input level.
- 6. To hear an existing track while overdubbing, press its track button so its indicator lights green.
- 7. Press REC. Overdubbing on the track chosen in step 4 starts.
- 8. Press STOP to stop.
- The overdubbed track is no longer record-ready, and its indicator lights green.
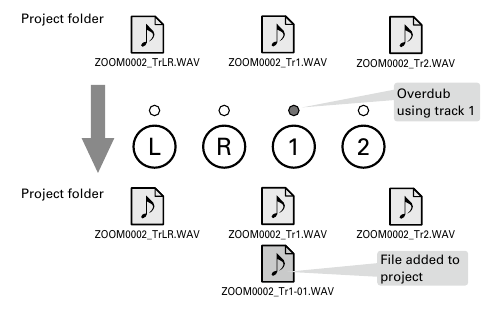
- An overdub never overwrites the file already on a track. It creates a new file named after the track with a two-digit take number, such as
ZOOM0001_TrLR-01.WAV. Any file can later be assigned to any track. - An overdub on track 1 adds a file to the project folder
- 9. Press PLAY/PAUSE to check the recording. Tracks with green indicators play back.
- Mixdown combines overdubbed recordings into one stereo file: Zoom H5/UG/10 Project and File Editing/04 Mixdown.
- 1. Press MENU, then use the scroll button to select
Assigning files to tracks
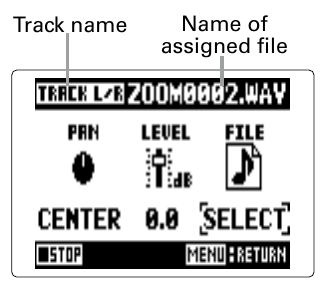
- 1. On the MIXER/OVERDUB screen, use the scroll button to select the track, then press the scroll button.
- 2. Select
FILE, then press the scroll button. - 3. Select a WAV file from the same project folder, then press the scroll button.
- MENU cancels the assignment.
- Select
NONEto remove the assigned file from the track. Note/Info A stereo track accepts only stereo files, and a mono track accepts only mono files.
Note/Info Files recorded in MS-RAW mode cannot be assigned to tracks 1/2.
- Playing back a mixed-down file while overdubbing new tracks lets recordings be layered again and again: Zoom H5/UG/10 Project and File Editing/04 Mixdown.
Ending overdubbing
55 Linked References
Hierarchy
- Zoom H5UG08 Recording01 Process
- Zoom H5UG08 Recording02 Mode Overview
- Zoom H5UG08 Recording02 Mode OverviewAsset01-MULTI-FILE-signal-flowpng
- Zoom H5UG08 Recording02 Mode OverviewAsset02-STEREO-FILE-signal-flowpng
- Zoom H5UG08 Recording03 Select Mode
- Zoom H5UG08 Recording03 Select ModeAsset01-Rec-mode-screenpng
- Zoom H5UG08 Recording04 Folders and Files
- Zoom H5UG08 Recording04 Folders and FilesAsset01-Folder-and-file-structurepng
- Zoom H5UG08 Recording05 Inputs and Levels
- Zoom H5UG08 Recording05 Inputs and LevelsAsset01-Track-buttons-and-input-knobspng
- Zoom H5UG08 Recording05 Inputs and LevelsAsset02-Level-meterspng
- Zoom H5UG08 Recording06 Recording
- Zoom H5UG08 Recording06 RecordingAsset01-Recording-controlspng
- Zoom H5UG08 Recording07 Save Location
- Zoom H5UG08 Recording07 Save LocationAsset01-Folder-screenpng
- Zoom H5UG08 Recording08 Auto Rec
- Zoom H5UG08 Recording08 Auto RecAsset01-Start-level-linepng
- Zoom H5UG08 Recording08 Auto RecAsset02-Recording-standbypng
- Zoom H5UG08 Recording09 Pre-Rec
- Zoom H5UG08 Recording10 Count In
- Zoom H5UG08 Recording10 Count InAsset01-Special-precount-patternpng
- Zoom H5UG08 Recording11 Side Mic Level
- Zoom H5UG08 Recording11 Side Mic LevelAsset01-Side-mic-level-displaypng
- Zoom H5UG08 Recording12 Backup Rec
- Zoom H5UG08 Recording13 Overdubbing
- Zoom H5UG08 Recording13 OverdubbingAsset01-Mixer-overdub-screenpng
- Zoom H5UG08 Recording13 OverdubbingAsset02-Overdub-file-addedpng
- Zoom H5UG08 Recording13 OverdubbingAsset03-Track-settings-screenpng