Ableton/Live/UG/34 MIDI and Key Remote
- Mapping Live's controls to MIDI controllers and computer keys, and the Mapping Browser.
- Live can be remote-controlled from external MIDI control surfaces such as MIDI keyboards and controller boxes, and from Push 1, Push 2 and Push 3.
- Remote control is separate from playing a MIDI track. A key or controller assigned to a Live control stops reaching the MIDI track: if C-1 launches a clip, it no longer plays C-1 on the instrument. The Control Bar's MIDI indicators show which way incoming MIDI went.
- Set up control surfaces first, in the Link, Tempo & MIDI tab of Live's Settings (
Cmd+, on Mac, Ctrl+, on Windows). - Choose control surfaces in the Control Surface column of the Link, Tempo & MIDI tab. Live can use up to six at once.

- If the controller is listed in the first Control Surface chooser, pick it by name and set its MIDI input and output ports in the next two columns. If it is not listed, set it up by hand instead — see Ableton/Live/UG/34 MIDI and Key Remote/01 MIDI Remote Control/02 Manual Control Surface Setup.
- Some controllers need a preset dump. The Dump button next to the choosers becomes active when one is needed. Put the hardware in a state to receive the dump (the hardware's own documentation says how), then press Dump.
- An instant mapping is Live's built-in assignment of its functions to a supported controller's knobs, sliders and buttons. The controls follow the selected device, reassigning themselves to whatever device is in focus.
- Manual assignments override instant mappings. For that, also turn on the Remote switches for the controller's ports in the MIDI Ports section.
- A supported controller can be locked to one device so it stays in reach wherever the focus moves: right-click the device title bar and pick the controller under Lock to…. A hand icon in the title bar marks a locked device.
- By default, arming a MIDI track locks its instrument to the control surface.
- Some control surfaces cannot lock to devices.
- A controller that is not in the Control Surface chooser can still be mapped by hand from the MIDI Ports section of the Link, Tempo & MIDI tab.

- To use an input port for remote control, set its Remote switch to On. Any number of ports can be on; Live merges their MIDI.
- For a controller with motorized faders or LEDs, also turn on Remote for its output port so Live can send changed values back to it.
- To test, send MIDI from the controller: the Control Bar's MIDI indicators flash when Live receives a message.
- The manual suggests choosing a Takeover Mode before leaving Settings — Ableton/Live/UG/34 MIDI and Key Remote/01 MIDI Remote Control/03 Takeover Mode. Mapping then happens one parameter at a time.

- Takeover Mode decides what happens when a control that sends absolute values, such as a fader, is first moved after a bank switch has pointed it at a different parameter, so the hardware and the parameter disagree.
- None — the new value goes straight to the parameter, usually as a sudden jump.
- Pick-Up — moving the control does nothing until it passes the parameter's current value; from then on the parameter follows the control. Smooth, but the pick-up point is hard to predict.
- Value Scaling — Live compares the two values and brings the parameter toward the control smoothly as the control moves, then follows it 1:1 once they meet.
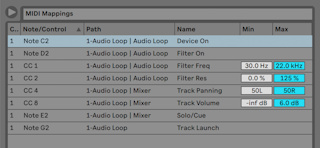
- The Mapping Browser manages every manual MIDI, computer-key and Macro Control mapping. It appears only while one of the three mapping modes is on, and shows the mappings for that mode.
- Each row shows the control, the path to the mapped parameter, the parameter name, and the mapping's Min and Max. Min and Max can be edited at any time and swapped with a context menu command. Delete a mapping with Backspace (Windows) or Delete (Mac).
- Instant mappings depend on context and are not listed here.

- After the controller is set up in Settings:
- 1. Turn on MIDI Map Mode with the MIDI switch in Live's upper right corner (
Cmd+M on Mac, Ctrl+M on Windows). Mappable controls turn blue and the Mapping Browser appears. Cmd+Opt+B (Mac) or Ctrl+Alt+B (Windows) opens the browser if it is closed. - 2. Click the Live control to map.
- 3. Move a knob or press a key or pad on the controller. The new mapping appears in the Mapping Browser.
- 4. Press the MIDI switch again to leave MIDI Map Mode. Entering it again shows the mappings.
- Launchpad/Custom/Mode/1 Arrangement maps a Launchpad pad to Arrangement Record this way.
- A mapped MIDI note sends Note On and Note Off to the control:
- Session View slots — clips respond according to their Launch Mode.
- Switches — each Note On flips the switch.
- Radio buttons — each Note On steps to the next option.
- Variable parameters — one note flips the parameter between its Min and Max. A range of notes spreads evenly spaced values across the parameter's range, one per note.
- A slot can be mapped to a note range for playing a clip chromatically: press the root key (default transposition), and while holding it, press one key below and one above to set the range limits.
- Absolute controllers send values from 0 to 127. The result depends on what they are mapped to:
- Session View slots — 64 and above act as Note On, 63 and below as Note Off.
- Track activators and device on/off switches — a value inside the mapping's Min–Max range turns the switch on; outside it turns it off. Setting Min above Max reverses that.
- Other switches, such as transport controls — 64 and above on, below 64 off.
- Radio buttons — 0–127 is spread across the options.
- Continuous controls — 0–127 is spread across the parameter's range.
- Pitch bend and 14-bit absolute controllers (0–16383) work the same way, with the center at 8191/8192.
- Relative controllers send "increase" and "decrease" messages instead of absolute values, so a parameter never jumps when the hardware and Live disagree. A relative pan knob just moves the pan a little from wherever it is.
- Live supports four kinds — Signed Bit, Signed Bit 2, Bin Offset and Twos Complement — each also in a linear version. Some encoders accelerate, sending bigger steps when turned quickly.
- For controllers that are not natively supported, Live tries to detect the kind and whether acceleration is used. Turning the control slowly to the left while mapping helps. Live's guess appears in the Status Bar's mode chooser, where it can be changed by hand.
- What the messages do:
- Session View slots — increase acts as Note On, decrease as Note Off.
- Switches — increase turns on, decrease turns off.
- Radio buttons — increase steps forward, decrease steps back.
- Continuous controls — each kind reads the 0–127 range differently to tell increases from decreases.
- Besides mapping single slots and scenes, controls can be mapped to move the highlighted scene and launch the highlighted clips. In MIDI Map Mode and Key Map Mode a strip of mappable controls appears below the Session grid.
- The strip has:
- buttons that move the highlighted scene up and down
- a scene number box, best mapped to an endless encoder, for scrolling through scenes
- a button that launches the highlighted scene; with Select Next Scene on Launch on in the Record, Warp & Launch Settings, each press moves on to the next scene
- a button that cancels a triggered scene launch
- one button per track that launches that track's clip in the highlighted scene
- Live keeps the highlighted scene centered in Session View, which helps in large Sets.
- Clip View shows whichever clip is selected, or several clips at once, so a mapping to a Clip View control can change any clip in the Set. The manual recommends relative controllers for Clip View controls to avoid jumps.

- 1. Turn on Key Map Mode with the KEY switch in the upper right corner (
Cmd+K on Mac, Ctrl+K on Windows). Mappable controls turn red and the Mapping Browser appears. - 2. Click the control to map; only controls with a red overlay can be mapped.
- 3. Press the computer key to assign. The mapping appears in the Mapping Browser.
- 4. Press KEY again to leave Key Map Mode.
- Mapped keys work like MIDI notes: slots follow their Launch Mode, switches flip, and radio buttons step through their options.
- Key mapping is different from the computer MIDI keyboard, which turns keystrokes into MIDI notes for instruments.
- Suggested key mappings for locators: Ableton/Manual/06/03