Ableton/Live/UG/19 Recording New Clips
- Recording audio and MIDI into new clips: inputs, arming, count-in, quantized recording, file types and Capture MIDI.
- This chapter covers recording clips from audio and MIDI inputs, which differs from capturing Session clips into the Arrangement.
- Microphones, guitars and turntables aren't line level and need a preamp, either in the audio interface or external, before they can be recorded.
- On MIDI tracks, Capture MIDI recovers what you just played without pressing Record first.
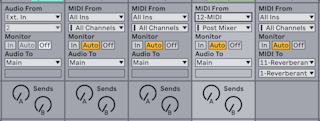
- A track records whatever input its In/Out section shows (View → In/Out). In Arrangement View, unfold and enlarge the track to see all of it.
- By default an audio track records mono from external input 1 or 2, and a MIDI track records all incoming MIDI from active input devices. The computer MIDI keyboard works when no controller is attached.
- Any track can instead record another mono or stereo input, one channel of one MIDI device, or another track; see Ableton/Live/UG/17 Routing and IO.
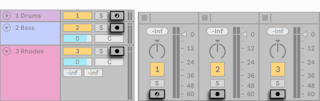
- Click a track's Arm button to record-enable it. Session and Arrangement share tracks, so either view works.
- Armed tracks are monitored by default ("auto-monitoring"), so you hear the input through the device chain.
- Arming a MIDI track locks a natively supported control surface to the track's instrument.
- Arming one track disarms the others unless you hold
Cmd (Mac) / Ctrl (Windows) or several tracks are selected. Arming also selects the track, showing its devices.
- Record in Arrangement View to capture several tracks at once and watch the take build along the timeline. Record in Session View to split a take into clips on the fly or to record while launching clips.
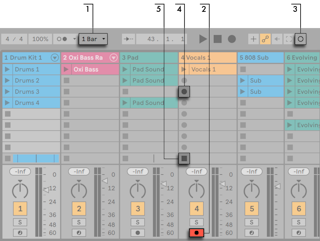
- Set Global Ableton/Live/UI/Control Bar/Menu/Quantization to anything but None so clips are cut on time.
- Arm the tracks; empty slots on armed tracks show Clip Record buttons.
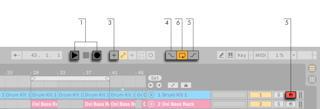
- Session Record records into the selected scene on every armed track; the new clips' launch buttons turn red. Press it again to switch straight to looped playback.
- Or click one Clip Record button to record a single slot, and press the clip's Launch button to loop it.
- A slot's Clip Stop button, or the Control Bar's Stop, stops the clip.
- The New button stops clips on armed tracks and selects a scene ready for a new take, adding a scene if needed. It only appears in Key Map and MIDI Map modes, for mapping.
- Launching a scene doesn't record into its empty armed slots unless Start Recording on Scene Launch is on in the Record, Warp & Launch Settings.
- To build a drum pattern or melody layer by layer in a looping clip:
- Set Global Quantization to one bar, and choose a Record Quantization value if notes should be quantized as they're recorded.
- Double-click an empty Session slot on the instrument's MIDI track to make an empty one-bar clip; change its loop length if needed.
- Arm the track and press Session Record. Notes are added on every loop pass.
- Press Session Record to switch between overdubbing and playing along without recording.
Option/Alt-double-click an empty slot to create the clip, arm the track and launch it in one step.- Undo removes the last pass; notes can be drawn, moved or deleted in the MIDI Note Editor while recording continues.
- Step recording enters notes with the transport stopped, at your own pace.
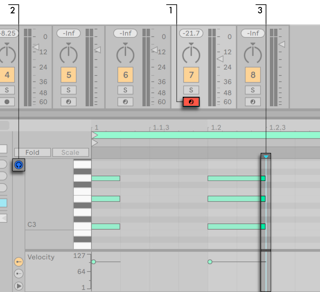
- Arm the track, turn on Preview in the clip's MIDI Editor, and click where recording should start.
- Hold notes and press the right arrow to enter them and move the insert marker one grid step; keep holding and press it again to lengthen them. Hold the notes and press the left arrow to delete them.
- The step arrows can be MIDI mapped.
- Live keeps recordings in sync even when the tempo changes later, so a hard part can be recorded slowly and sped up afterwards. That only works if the recording was made in time.
- The easiest way is to play with the metronome: turn on Ableton/Live/UI/Control Bar/Switch/Metronome and it ticks once Play is pressed or a clip launches.
- The mixer's Preview Volume knob sets its level; the menu next to the switch holds further settings.
- Warp Markers can later fix timing or change the feel of audio and MIDI recordings.
- Open from the menu next to the metronome or its context menu.
- Sets the recording count-in length and the tick sound.
- Rhythm sets the tick's beat division. Auto follows the time signature's denominator; divisions that don't fit a bar are disabled. If a time signature change makes the chosen division not fit, the tick falls back to Auto, and returns once it fits again.
- Enable Only While Recording keeps the metronome silent except while recording. With Punch-In on, it sounds only after the punch-in point.
- Edit → Record Quantization lines up recorded MIDI notes to a chosen subdivision.
- In the Arrangement, record quantization is its own Undo step, so Undo can remove the quantization and keep the take.
- It can't be changed while recording, except when overdubbing a looping clip, where changes apply at once and can't be undone separately.
- Notes can also be quantized afterwards with Edit → Quantize; see Ableton/Live/UG/10 Editing MIDI.
- Set a count-in from the menu next to the Metronome switch. Recording starts once it finishes.
- The Control Bar's Arrangement Position shows the count-in in blue, counting from negative values (−2.1.1 for two bars) up to 1.1.1.
- Record, Warp & Launch Settings choose the File Type and Bit Depth of recorded samples.
- Choosing a default Warp Mode that fits what you record keeps quality good if the tempo changes later.
- Recordings go to the Project folder under Samples/Recorded. Before the Set is saved they live in the Temporary Folder (Settings → File/Folder), which should be on a drive with plenty of space.
- Key Map Mode and MIDI Map Mode let you record without the mouse.
- Map Arrangement Record, the transport and track Arm buttons; Launchpad/Custom/Mode/1 Arrangement maps a Launchpad pad to Arrangement Record.
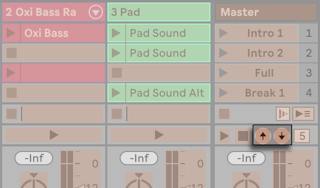
- For Session recording, map Session Record and New, individual slots, or the relative controls — for example one key for scene down and another to start and stop recording on a track.
- Map the step recording arrows to foot pedals to move the insert marker while both hands play.
- Live keeps listening to MIDI on armed or monitored tracks. Capture MIDI turns what you just played into a clip, for when you forgot to record or were improvising.
- On Push 1 and Push 2, hold Record and press New; Push 3 has a Capture button.
- What it does depends on the state of the Set.
- When the Set has no clips and the transport is stopped:
- every monitored MIDI track gets a clip with the phrase, in whichever view has focus;
- Live sets the tempo (within 80–160 BPM), the loop and the notes' grid positions. Ending on the downbeat of the next bar helps it find the phrase;
- the transport starts and plays the loop, ready for overdubs;
- notes played before the phrase stay in the clip ahead of the start marker, so the loop can be moved. Crop Clip discards the rest.
- If the first capture is a single note, the loop spans that note and the tempo is set to make it one, two, four or eight bars.
- When the transport is running, the Set has clips, or tempo is automated, Capture MIDI keeps the tempo and finds a phrase within it.
- Playing over a clip on the same track and pressing Capture MIDI adds the new notes on top, for building a pattern in layers.
- Earlier notes are kept ahead of the start marker here too.