Ableton/Live/UG/18 Mixing
- The mixer: audio, MIDI, group and return tracks, the Main track, the crossfader, solo and cue, and track delays.
- The mixer appears in both views: below the scenes in Session View, and as the Arrangement mixer or each track's Track Controls in Arrangement View.
- The mixer view control at the bottom right shows or hides the mixer; the menu next to it picks which parts show.

- Meter — peak and RMS output level, or input level while monitoring. Peak shows sudden changes; RMS is closer to perceived loudness.
- Volume — the track's output level.
- Pan — Stereo Pan (default) turns one side up and the other down; Split Stereo Pan places left and right channels separately. Switch modes in the context menu. Double-click, or click the triangle above it, to reset. Panning changes the audio; see Ableton/Live/UG/39 Audio Fact Sheet.
- Track Activator — mutes the track when off.
- Solo (
S) — mutes all other tracks, or cues when set up for it. Only one track solos at a time unless you hold Cmd (Mac) / Ctrl (Windows) or turn off Exclusive Solo. - Arm — record-enables the track, again one at a time unless you hold the modifier or turn off Exclusive Arm. With Exclusive Arm on, adding an instrument to an empty MIDI track arms it.
- With several tracks selected, changing any of these on one changes it on all.

- Drag the top of the mixer up to get taller meters with tick marks, a numeric volume field and resettable peak indicators; widen the track to add a decibel scale.
- Live's 32-bit floating-point engine has so much headroom that tracks can go well above 0 dB without clipping. Levels over 0 dB only matter where audio leaves Live: physical inputs and outputs, the Main track, and files you save or export.
- Audio and MIDI tracks host and play clips.
- Create them from the Create menu, with
Cmd+T (audio) and Cmd+Shift+T (MIDI) on Mac / Ctrl+T and Ctrl+Shift+T on Windows, by loading a file or device from the browser, or by dragging content into the empty space beside or below the tracks. Dragging clips there makes a new track with those clips and the original track's devices. Title bars
- Click a title bar to select the track for Edit menu commands. Rename with
Cmd+R / Ctrl+R; Tab moves to the next track. - A
# in the name becomes an automatic track number; extra #s add leading zeros. Edit Info Text adds a description; see Ableton/Info Text. - Drag title bars to reorder tracks; drag their edges to change width (Session) or height (Arrangement).
Selecting and saving
Shift-click selects a range; Cmd/Ctrl-click adds single tracks. Dropping a non-adjacent selection packs the tracks together; Ctrl+arrow keys move them without that.- Adjusting a control on several selected tracks keeps their differences.
- Drag a title bar to a folder in the browser's Places to save the track as a new Set, collecting its samples as set by Collect Files on Export.
- Edit → Delete removes a track.
- Edit → Group Tracks puts the selected tracks, or Group Tracks, into a Group Track. Group Tracks can't hold clips but have mixer controls and audio effects.
- Grouped tracks are routed to the group automatically unless they already went somewhere other than Main, which makes groups quick submixes. Rerouting their outputs makes the group a plain folder.
- The Unfold button in the title bar shows or hides the grouped tracks.
- Drag tracks in or out. Deleting a group deletes its tracks; Edit → Ungroup Tracks dissolves it instead.
- In Arrangement View a folded group shows an overview of its tracks' clips. In Session View a group slot launches, stops or selects all the clips in that scene.
- Assign Track Color to Grouped Tracks and Clips in the group's context menu recolours its contents, for the clips of the current view only.
- A group's Solo button shows half coloured when something inside it is soloed.
- Return tracks and the Main track can't play clips. They sit at the right of the Session mixer and the bottom of the Arrangement. Show or hide returns from View → Mixer Controls → Return Tracks.
- A return track's effects process audio sent from any number of tracks, so one delay can echo several tracks.
- A track's Send sets how much of it feeds each return. A return can even send to itself for feedback; because that can get loud fast, a return's own sends are off until you right-click → Enable Send or Enable All Sends.
- Each return's Pre/Post toggle taps sends before or after the track's pan, volume and activator. Pre makes an independent auxiliary mix, such as a separate monitor mix routed to its own output.
- The Main track receives every track by default; effects here, usually compression or EQ, process the whole mix. Add returns with Create → Insert Return Track; there is only one Main.
- Live's crossfader blends between any number of tracks, returns included. Show it from View → Mixer Controls or the mixer view control menu.
- Right-click it to choose one of seven curves.
- It maps to any continuous MIDI control. Its far left and right positions can also be mapped separately: a key on one position toggles between the extremes, and keys on two positions give a snap-back move.
- Each track's A and B Crossfade Assign buttons decide its response: neither, unaffected; A, full volume across the left half and fading to silence at the right; B, the reverse.
- Assignments change only volume at each track's gain stage, not routing — like a VCA group.
- Crossfader moves record into the Arrangement. Edit assignments under Mixer → X-Fade Assign in a track's envelope choosers, and the crossfader itself under Mixer → Crossfade on the Main track.
- Solo mutes all other tracks, keeping each soloed track's own output and pan. With Solo in Place (Solo button context menu, or the Options menu as default), return tracks stay audible.
- Soloing a return mutes other tracks' main outputs but still plays what they send to it.
- Cueing replaces solo with DJ-style preview: hear a track in headphones before the audience does. It needs at least two stereo outputs on the audio interface. The controls are on the Main track with the mixer and In/Out shown:

- 1 - Main Out and 2 - Cue Out — choose separate interface outputs; if they're missing, check the Audio Settings.
- 3 - Solo/Cue Mode — set to Cue. Solo buttons become headphone Cue buttons that send the track to Cue Out, while the Track Activator still controls the main mix.
- 5 - Cue Volume — the cue output level.
- With cueing on, browser previews also play through Cue Out.
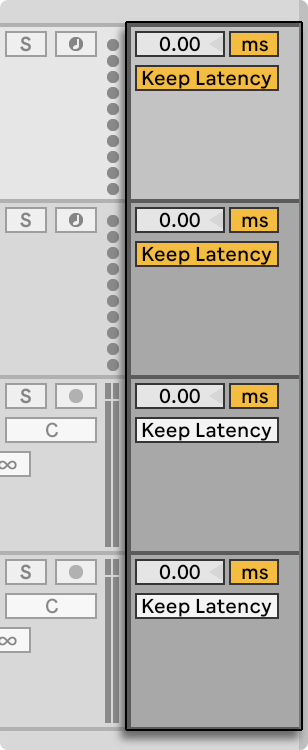
- Track Delay shifts a track's output earlier or later, to make up for human, acoustic or hardware delays.
- Show it with Track Options in View → Mixer Controls or the mixer config menu (below the track controls), or in View → Arrangement Track Controls (to the right of them).
- Set the amount with the slider and pick milliseconds or samples with the toggle.
- Avoid changing it during a performance, as it can click. For small offsets of Session clips, use Nudge in Clip View instead.
- Device delay compensation is separate and on by default. Very large delays or plug-in latencies can make Live sluggish; turning compensation off is not usually advised, and disables Track Delay.
- With monitoring on In or Auto, Keep Monitoring Latency in Recording is on by default, matching the recording to what you heard through Live.
- Keep it on for software instruments and effects; turn it off for acoustic instruments or external monitoring. Use the toggles, or right-click the In or Auto monitor button.
- Performance Impact indicators show each track's share of the CPU load as six rectangles. Show them from View → Mixer Controls or the mixer view control menu.
- Freezing the heaviest track or removing its devices usually lowers the load.